
A challenging and complex goblin cave system to challenge adventuring parties between the levels of 3-5. With 3 small encounters, and 2 large ones (with the potential of a small one merging into a large one) along with two optional encounters this cave system has enough to test the endurance of any lower level party. There are also a few traps and treasure chests for adventurers to stumble over, one of which can only be reached by small and tiny characters!
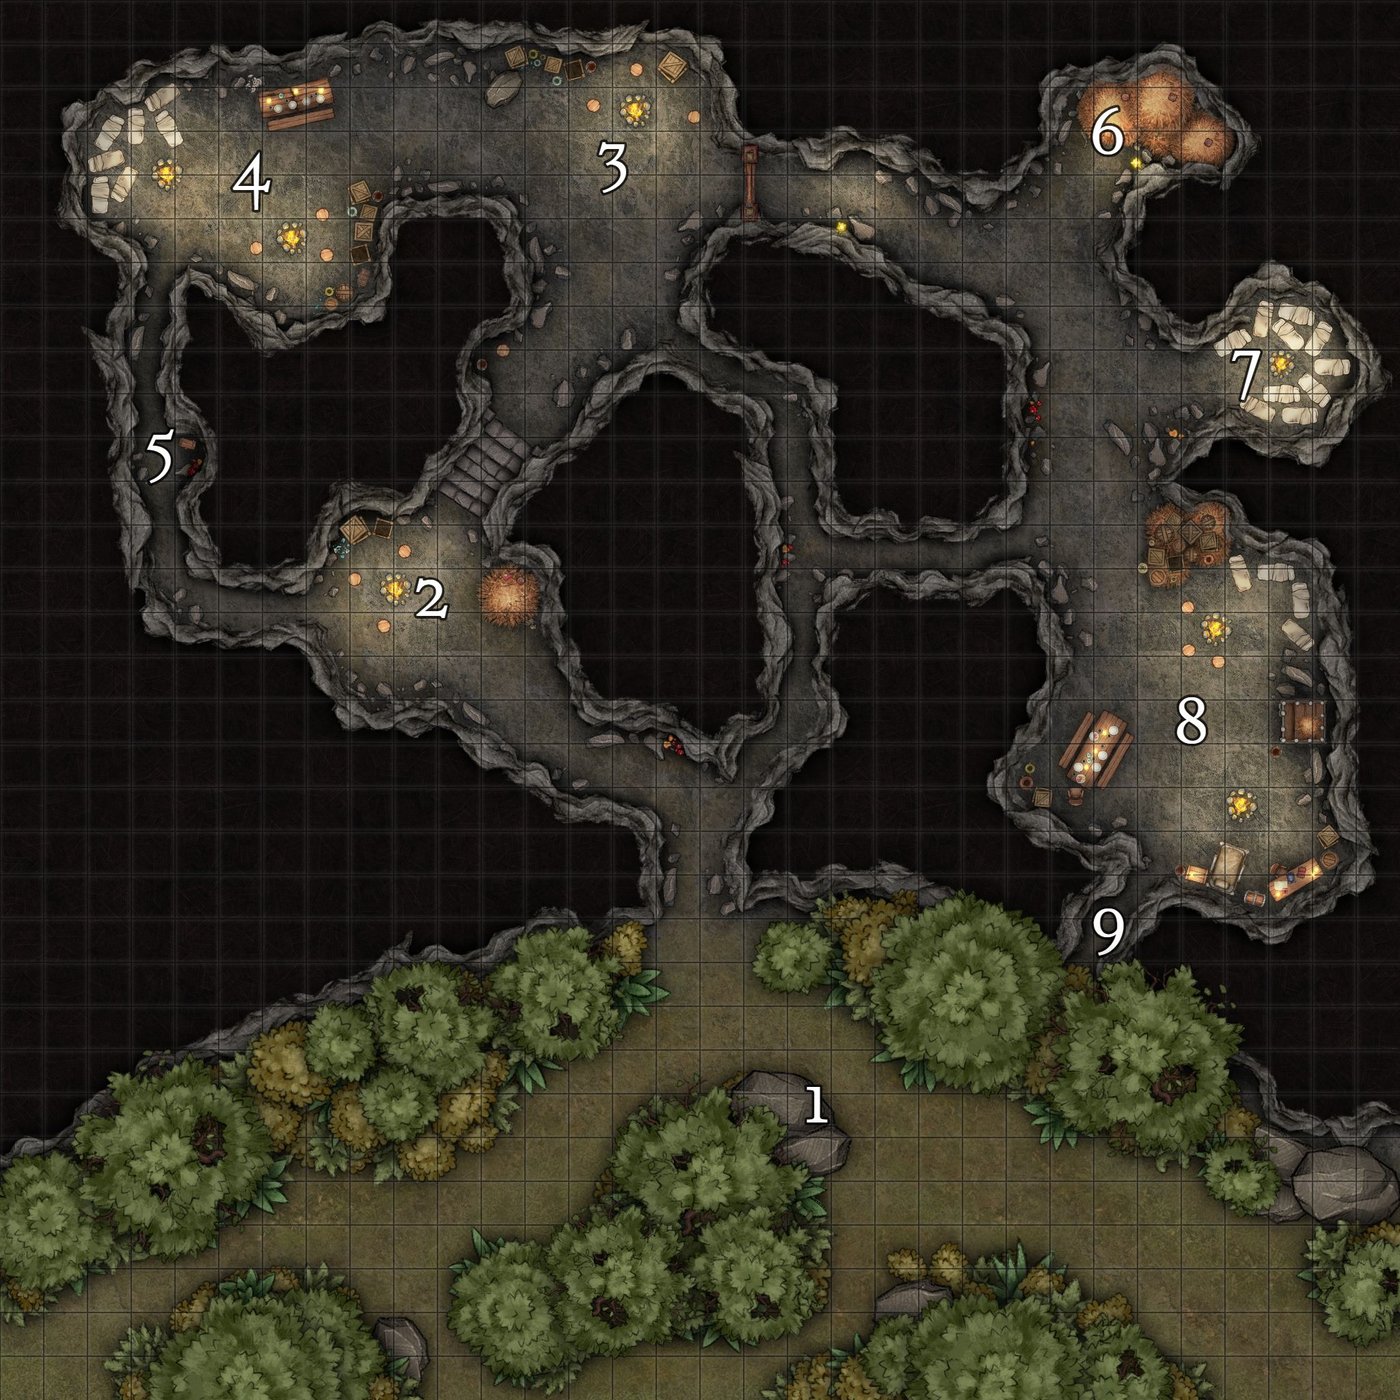
The cave system has several mechanics in place for the DM to really play up goblin tactics and strategy. It also features an imprisoned NPC to serve as a quest-hook for motivating the players to actually explore the cave and a system in place for the BBEG to escape and serve as another potential plot-hook and rival for the players. (Clone to remove DM Markers for a player version, or use this one https://i.imgur.com/bM7ccIg.jpg )
Area 1:
Two Goblin lookouts stand watch on the rocks outside their lair. They are, however, lazy and bored so will not notice the characters if they approach carefully or with stealth. If the players are noticed or attack, one goblin will attempt to waylay while the other retreats into the cave to warn the goblins in Area 2.
If the goblin that stayed behind loses 50% of it's health it will use the small tunnel inside the mouth of the cave to retreat to Area 8 and warn the goblins there. The passage can only be entered and traversed by creatures with a size of small, or tiny.
Area 2:
Three goblins and one wolf reside in this chamber. The wolf is in the bed of hay tied to a post, distracted by a piece of meat. The three goblins are arguing and have disadvantage towards noticing a stealthed or careful party initially. If the characters decide to wait, or otherwise delay after the argument one of the goblins will leave the group and head up the stairs to sit on a stool.
After the goblins have separated the remaining two will sit at the fire with no disadvantages towards noticing lurking characters. When combat breaks out the closest goblin to the wolf will always spend its first turn releasing the wolf. If the third goblin had gone up the stairs it will notice the fighting and join the battle after the first round.
Additionally, there is a tripwire trap 10ft south of the haybed extending across the cave tunnel. A character will automatically notice this with a passive perception of 12 or a DC10 if they're searching for traps.
If two of the goblins fall the remaining one will attempt to retreat either through the small passage leading to Area 4, or up the stairs to Area 3 to warn the other goblins. A goblin will also retreat if it loses 50% of its health. If the goblins have been warned by the goblin from Area 1, all four will be ready for the characters and attempt to surprise them as soon as they can see them.
If a player with passive perception of 12 passes within 5ft of the haybed they will notice skeletal remains under the hay. If the players decide to toss the hay however, they find nothing of value other than the gnawed skeleton of a halfling.
Area 3:
Four goblins are hanging out around the fire here, two of them are sitting near to the fire talking, while one is sitting against the wall of the cave, sleeping. The fourth goblin is rummaging through the crates behind the group.
The goblins have set up a small trip wire just past the top of the stairs, near the small side passage. A player will notice this automatically if they have a passive perception of 14, or if they are looking for traps with a DC14. If the players trigger the wire three of goblins will automatically attack, the sleeping one will wake up and join after round 1. If a goblin from Area 2 escapes and is able to warn Area 3, all of the goblins will be prepared and attempt to surprise the characters as they come up the stairs.
After two rounds of combat the goblins from Area 4 will join the fight. If any of the goblins during this fight loses 50% of its health, and has a clear path to the small tunnel to the right it may attempt to flee to Area 8, otherwise all goblins will fight to the death in these areas. The passage can only be entered and traversed by creatures with a size of small, or tiny. The door on the right of the area is locked with a shoddy lock. It can be picked with a thieves tools check of DC10, or alternatively bashed down with a strength check of DC15, or two DC10s. There is also a key to this door in Area 4.
Area 4:
Five regular goblins, and one goblin boss lounge around the fires and beds within this area. The goblin boss, and two goblins relax around the lower fire, while the remaining three are on the beds. Roll a 1d4 -1 to determine how many may be sleeping. If a goblin from Area 2 has escaped and managed to warn the goblins in Area 4 all of them will be prepared and waiting to surprise the characters coming from Area 3. If combat breaks out in Area 3 and lasts for more than 2 rounds all of the goblins will attempt to swarm the players fighting in Area 3.
There is a set of keys under the table in this area. These keys will unlock both the chest and the door in Area 3. A character with a passive perception of 12 will notice the keys if they're within 5ft of the table. The chest contains a small amount of cp/sp/gp and whatever common items the DM wishes, if any. If the players have not found the key it can be opened with a thieves tool check of DC12, or smashed open with a DC15 strength check, or two DC10s.
Area 5:
If a player character with a size of small or tiny decides to explore these goblin tunnels they will find an unlocked chest in a small alcove halfway through the tunnel. The chest contains a moderate amount of sp/gp.
Area 6:
The animal pen has three wolves secured to wooden posts. They won't notice the players if they avoid going within the mouth of the pen. If, however the players decide to approach, the wolves will tug at their leashes and the post to break free an attack. Every time a wolf attempts to break free roll a DC10 strength check, it takes two successes for the posts to break. If the players taunt the wolves, the wolves have advantage on their check.
Combat here will not alert the goblins in the further chambers unless the players are particularly loud. If the players aggravate the wolves but then leave before any have broken their chains, the wolves will not attempt to follow.
Alternatively, the wolves can be temporarily charmed with either food or an animal handling check. They will not attack goblins however, even if charmed. If the players investigate this chamber after dealing with the wolves a character coming within 5ft of the haybeds will notice the gnawed remains of two humanoid bodies under the hay. If the players decide to toss the bed and uncover the remains they find two human remains, one of which has a small golden ring on its finger worth a moderate amount of gp.
Area 7:
Roll 1d4 to determine how many goblins are asleep in this chamber. They are considered prone and have disadvantage on all checks and can be killed or rendered unconscious by the players if they choose. If a goblin manages to wake before the players have disable them they will call for help, waking the remaining goblins, and alerting the ones in Area 8.
If the players choose to ignore these goblins they will wake up after 1 round of combat in Area 8 and attempt to flank behind the players to surprise them.
Area 8:
Three goblins sit around the campfire of this area, while an additional on is sitting at the table eating. There is also one boss goblin and a bugbear (named preferably) in this chamber. The bugbear is at the desk with its back turned and the boss goblin sits at the head of the table also eating.
These goblins may be alerted from various means (see Area's 1/3/6/7 for the mechanics of how) and will be ready for the players when the approach, attempting to surprise them using both projectiles, and the small passage to the left to hide and attack from. You may also attempt to have a goblin use the tunnels to flank behind the players via Area 3. If a goblin does this they will also unleash the wolves in Area 6 to attack as well if the players have not killed or charmed the wolves. If the wolves have been charmed with only food they will attack on goblin command; if via animal handling the decision is up to the DM.
However, if the players have managed to avoid alerting this area the goblins can be taken by surprise. The barrels and crates here act as half-cover which are large enough to grant a player (or goblin) an advantage on stealth rolls if they are attempting to sneak. They also count as difficult terrain if either player or goblin attempts to move directly across them and they must make a DC10 Acrobatics check to avoid falling prone.
Once combat begins the bugbear will attempt to avoid being in the front lines unless absolutely forced, instead it will opt to use its javelin from range and remain near the bed and desk. The boss goblin, however, will eagerly engage in melee. As the fight progresses, if the bugbear reaches 50% health, or the boss goblin falls the it will attempt to flee out of the passage 9 near the bed. It will also attempt to flee if all of the normal goblins have been slain (or are close to death) and the boss goblin is at 50% health. If the wolves from Area 6 have joined the fight the DM must determine when exactly things have gone south enough for the goblins for the bugbear to attempt to flee.
The cage in this chamber can hold a NPC prisoner for a relevant quest, potential plot-hook, or a simple reward. The prisoner is badly beaten, malnourished and has been tormented by the goblins and bugbear, they have only 1hp. The poor health condition of the NPC should be described to the players if they have AoEs that may accidentally kill them, they may make death saves if the DM chooses.
There is also a chest next to the bugbears bed which can be unlocked with a DC15 thieves tool check. Alternatively, when describing the bugbears desk mention that it has drawers, if the players choose to search the drawers they will find the key. The chest can also be smashed open with a DC20 strength check, or two DC15s. This chest contains a significant amount of sp/gp along with several common to uncommon items/weapons/armor.
Area 9:
The passage near the bugbears bed is large enough for a creature of medium size to squeeze through. The bugbear will use this in an attempt to flee under a number of triggers as defined in Area 8.
From the outside, the passage is very well hidden. A player with a passive perception of 16 passing within 5ft may notice something strange about the foliage here (if the DM chooses,) however unless the players physically cut or burn down the bushes or pass a DC18 Investigation check the passage remains hidden.
If the players, however, do discover the passage they can use it to spy on Area 8 with advantage on any stealth checks. From this position they will be able to see the three goblins around the fire, the bugbear at its desk and the imprisoned NPC. The boss goblin and regular goblin at the table cannot be seen from this position.
If they choose to attack from this position, however, the players medium sized and smaller must filter in one by one into the chamber, the first character in will have surprised the goblins. The goblins in Area 7 will wake after one round of combat and join the battle, however one of them will head north to unleash the wolves in Area 6 then return with the wolves on round three.